Table of Contents
- What You’ll Need Before You Start
- How to Clean Leather Car Seats Before Repair
- Step 1: Assess the Cracks and Prep the Surface
- Step 2: Apply Leather Filler for Car Seats
- Step 3: Sand, Colour and Seal the Repair
- Choosing a Leather Car Seat Repair Kit
- Common Mistakes to Avoid
- How to Prevent Leather Car Seats from Cracking
- Frequently Asked Questions
Last Updated: October 18, 2026
What You’ll Need Before You Start
Cracked leather car seats are one of the most common interior problems, and the good news is that most cracked leather car seats can be repaired at home with the right kit and a little patience. This guide walks you through how to fix a cracked leather car seat step by step. Before you touch the leather, gather everything below so you are not stopping halfway through.
- A leather car seat repair kit with filler, colourant and sealant
- A soft brush and microfibre cloths
- A dedicated leather cleaner
- Fine grit sandpaper (around 800 to 1200 grit)
- A small spatula or applicator
- Low-tack masking tape
- Clean water and a spray bottle
Never start a repair on a dirty or damp seat. Filler will not bond to grime or moisture, and the patch will lift within weeks. Clean and dry the leather fully first.
How to Clean Leather Car Seats Before Repair
Cleaning is the step most people rush, and it is the one that decides whether the repair lasts. How to clean leather car seats before repair comes down to three things: lift the dirt, rinse the residue, then let the surface dry completely. Skip any of these and your filler will fail.
Work in this order:
- Brush off loose grit with a soft brush.
- Apply a pH-balanced leather cleaner with a microfibre cloth.
- Wipe away residue with a clean, damp cloth.
- Let the seat air dry for at least an hour.
Do not use household detergent. It strips the oils that keep leather supple, which makes cracking worse over time. For general care guidance, the UK Leather Federation care advice is a useful reference.
Step 1: Assess the Cracks and Prep the Surface
Some cracks are cosmetic. Others mean the leather has started to split through, and those need a different approach. Run your fingertip across the damage. If the crack catches your nail, it is deep enough to need filler. If the leather feels thin or has torn right through, a professional repair is the safer call.
Prep the area properly:
- Clean the crack with a cotton bud dipped in cleaner.
- Tape around the repair to protect the surrounding leather.
- Use a pin to gently lift any loose fibres out of the crack.
- Wipe with a final clean cloth and let it dry.
Photograph the damage before you start. If the repair does not go to plan, a photo helps a professional assess what went wrong and fix it faster.
Step 2: Apply Leather Filler for Car Seats
Leather filler for car seats is a flexible compound that fills the crack and creates a smooth surface for colour. Apply it in thin layers, not one thick blob. Thick filler traps air, dries unevenly and cracks again within months.
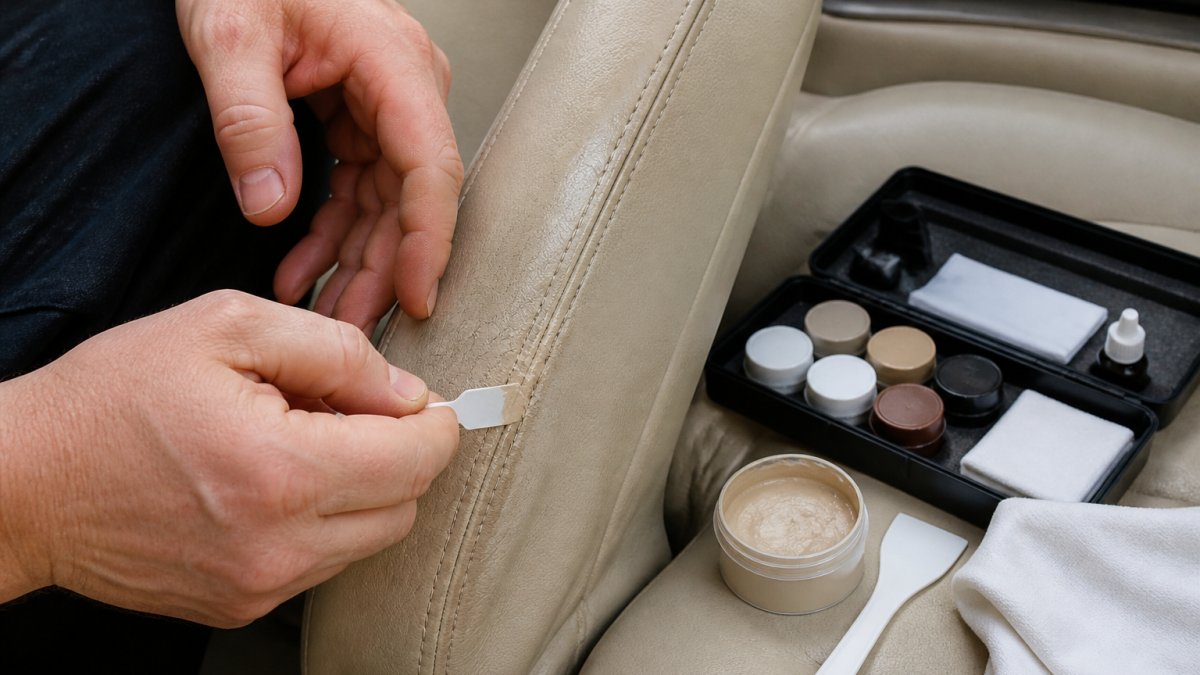
Here is how to apply it:
- Scoop a small amount of filler onto the spatula.
- Press it into the crack, working from the edges inward.
- Smooth the surface level with the surrounding leather.
- Let it dry for the time stated on the kit.
- Apply a second thin layer if the crack is still visible.
Most fillers need two to three thin coats. Rushing this step is the single biggest reason DIY repairs look patchy.
Step 3: Sand, Colour and Seal the Repair
Once the filler is fully dry, sand it lightly with fine grit paper until it sits flush. Wipe away the dust. Now apply the colourant, matching your seat’s shade as closely as you can. Build it up in thin coats, letting each one dry.
Finish with a sealant to lock in the colour and protect the repair. A sealant also adds flexibility, which matters on a seat that bends every time someone sits down. Leave the seat unused for at least 24 hours after sealing.
Choosing a Leather Car Seat Repair Kit
A leather car seat repair kit is only as good as its colour match and flexibility. Cheap kits often include a rigid filler that looks fine for a month, then cracks again. Look for these features:
| Feature | Why It Matters |
|---|---|
| Flexible filler | Moves with the seat without cracking |
| Colour matching system | Blends the repair into the original shade |
| Sealant included | Protects the repair and adds durability |
| Clear instructions | Reduces the risk of application errors |
The best kit is not the most expensive one. It is the one with flexible filler and a proper colour match for your seat.
If colour matching feels beyond a DIY kit, that is where a professional service earns its keep. Our technicians match colour and texture so repairs stay invisible, and we can come to you rather than take the car away. You can check the DVLA guidance on vehicle interiors for general advice on keeping a car in good condition for resale.
Common Mistakes to Avoid
The same errors come up again and again, and each one shortens the life of the repair.
- Skipping the clean. Filler will not stick to dirt or oil.
- Applying filler too thick. It dries unevenly and cracks again.
- Sanding before the filler is fully dry. You will pull the patch out.
- Using the wrong colour. A poor match makes the repair obvious.
- Sitting on the seat too soon. Give the sealant a full day to cure.
Do not use a heat gun or hairdryer to speed up drying. Direct heat can shrink and harden the leather, causing new cracks around the repair.
How to Prevent Leather Car Seats from Cracking
Prevention is far cheaper than repair. How to prevent leather car seats from cracking comes down to moisture, sunlight and friction. Keep the leather conditioned, park in the shade where you can, and clean up spills quickly.
A simple routine helps:
- Condition the leather every three to six months.
- Wipe up spills as soon as they happen.
- Use a sunshade on hot days.
- Avoid sharp objects on the seats.
If cracking has already set in across several panels, a professional assessment is worth it. Uniqcare has over 40 years of experience restoring leather furniture and vehicle interiors, with fully DBS checked technicians who repair at your home. Get a quote and we will tell you honestly whether a repair is worth it or whether replacement makes more sense.
Frequently Asked Questions
Can cracked leather car seats be repaired at home?
Yes, surface cracks and crazing on leather car seats can be repaired at home with a repair kit, filler and colourant. Cleaning the seat first is the step most people skip, and it decides whether the filler bonds. Deep splits down to the foam, or cracks across a heavily worn bolster, are better handled by a professional who can match the grain and colour properly.
Can leather filler repair cracks in a car seat?
Leather filler for car seats works on cracks that sit in the top coating rather than through the hide. Apply it in thin layers, letting each one dry, then sand flat and recolour. Thick single applications shrink and crack again within weeks. If the crack opens when you press beside it, filler alone won’t hold and the panel needs professional attention.
How long does it take to repair a cracked leather car seat?
A small area of surface cracking takes around an hour of hands-on work, but drying time between filler layers stretches it across a day. Larger cracked panels on a driver’s bolster usually need two sessions. Professional repairs are often completed at your home in a single visit, which matters if you need the car back in use quickly.
How can you stop leather car seats from cracking further?
Clean and condition the leather every three to six months, park out of direct sun where you can, and keep sharp objects off the seats. Cracking starts when the top coating dries out and flexes. Once a crack is sealed, conditioning around it slows the spread. Left alone, small cracks widen into splits that no kit will fix.
Cracked leather does not have to mean a costly replacement. With the right kit and a careful hand, most surface cracks can be fixed in an afternoon. Where the damage runs deeper, or you want a finish that truly disappears into the original leather, Uniqcare can help. Our technicians offer invisible repair of cuts, scrapes and wear patches, carried out at your home with minimum fuss. Get a quote from Uniqcare and restore the comfort and value of your interior.